| Назва | Версія | Ліцензія | Джерело | Мови | Автор | Опис |
|---|---|---|---|---|---|---|
| Бібліотека низькорівневих сенсорів та чипів | 1.6 | GPLv2 | OscadaLibs.db (SQL, GZip) > DAQ.tmplb_LowDevLib | en, uk, ru | Роман Савоченко Аркадій Кисіль (2017) |
Бібліотека шаблонів надання доступу до даних пристроїв низькорівневих шин.
|
Бібліотеку пристроїв користувацьких протоколів створено для надання доступу до даних пристроїв низькорівневих шин, із протоколом достатньо простим до реалізації у модулі користувацького протоколу або безпосередньо на внутрішній мові подібній до Java.
Назви елементів та їх параметрів доступні на мовах: Англійська, Українська та mRussian. Їх вихідний код написано у мово(людська)-незалежному режимі з викликом функції перекладу tr() та переклад цих повідомлень також доступний Англійською, Українською та mRussian.
Для підключення бібліотеки до проекту станції OpenSCADA ви можете отримати файл БД як:
- такий що постачається з готовим та відповідним пакетом дистрибутиву Linux на кшталт "openscada-libdb-main", "openscada-LibDB.Main";
- найбільш актуальний та безпосередньо отриманий з репозиторію subversion, перетворений у файл БД SQLite шляхом:
wget http://oscada.org/svn/trunk/OpenSCADA/data/LibsDB/OscadaLibs.sql
sqlite3 -init OscadaLibs.sql OscadaLibs.db .exit
- завантаження прикріпленого тут.
Цей отриманий файл ви надалі можете розмістити у теці проекту станції та створити об'єкт бази даних модуля БД "SQLite", зареєструвавши файл бази даних у конфігурації.
Contents
[hide]- 1 BT: RDTech UM24C, UM25C та UM34C (RDTech)
- 2 BT: ATORCH UC96, UD24 (UC96)
- 3 One Wire by DS9097 (1W_DS9097)
- 4 One Wire by DS9097U (1W_DS9097U)
- 5 I2C: PCF8591 (PCF8591)
- 6 I2C: PCF8574 (PCF8574)
- 7 I2C: ADS101x, ADS111x (ADS111x)
- 8 I2C: MCP4725 (MCP4725)
- 9 I2C: BMP180 (BMP180)
- 10 I2C: BME280 (BME280)
- 11 I2C: SHT3x (SHT3x)
- 12 I2C: DS1307,DS3231 (DS3231)
- 13 I2C: AT24C{32|64} (AT24CXX)
- 14 GPIO: DHT11,22 (DHT)
- 15 GPIO: MAX6675 (MAX6675)
- 16 GPIO|I2C: 1602A(HD44780) (1602A)
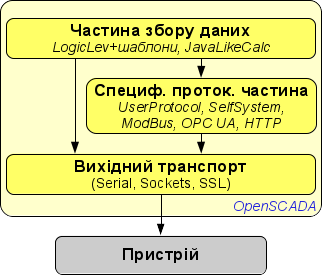
Для DAQ-шаблонів, загалом, вам треба створити представницький об'єкт пристрою у модулі Логічного контролеру та обрати відповідний шаблон із бібліотеки шаблонів. Далі, для коректної конфігурації, дотримуйтесь специфіки шаблону у його особистому описі. Концепцію доступу до даних через користувацький протокол можна зобразити як на рисунку 1.
Як можна бачити з рисунку 1, взаємодія з пристроєм відбувається через деякий транспорт на якому вони фізично базуються. Запит до транспорту Ви можете надіслати:
- Безпосередньо за допомогою функції системного API OpenSCADA об'єкту транспорту string messIO( string mess, real timeOut = 0 );, якщо протоколоспецифічна частина дуже проста та дані вам потрібно лише вилучити.
- Загорнутий запит даних req, функцією int messIO( XMLNodeObj req, string prt ); та для протоколу prt, якщо протокольна частина достатньо складна та вже представлена у OpenSCADA.
- Загорнутий запит даних специфічний до користувача за допомогою функції int messIO( XMLNodeObj req, "UserProtocol" ); та реалізації користувацького протоколу, якщо протокольна частина достатньо складна та ще відсутня у OpenSCADA. Користувач реалізує тут саму протоколоспецифічну частину у модулі UserProtocol та частину специфічну до даних у шаблоні для модуля Логічного Рівня або безпосередньо у процедурі контролеру на внутрішній мові програмування модуля JavaLikeCalc.
-
 Цей останній метод наразі розвинено до можливості формування протокольної частини коду безпосередньо у тому-ж коді шаблону, як окрема вбудована функція через виклик функції запиту першого методу, якщо немає потреби повторного використання, або навіть якщо така потреба є та тут має сенс створення комплексного шаблону, який зможе поєднувати роль й вихідного протоколу, через його підключення також до модуля користувацького протоколу. Та воно буде повністю зберігатися у одній бібліотеці шаблонів.
-
![]() Пряма робота із вихідним транспортом функції string messIO( string mess, real timeOut = 0 ); не передбачає блокування транспорту поза викликом цієї функції, а відтак, для складних протоколів із посилками відповіді більш ніж у одному пакеті, що передбачає процес "доочікування", не можна використовувати спільний транспорт, за яким можливе надсилання пакетів різних протоколів або навіть один, але з різних завдань (об'єктів контролерів). Відтак, якщо є потреба використання спільного транспорту, то розташовуйте параметри опитування за протоколом у одному об'єкті контролеру (завдані) або використовуйте модуль користувацького протоколу, до якого це зауваження не має стосунку, оскільки він здійснює таке блокування на час виклику процедури обробки, як і решта модульних протоколів OpenSCADA.
Для розташування реалізації протоколу тут ви маєте виконати та дотримуватися наведених вимог:
Пряма робота із вихідним транспортом функції string messIO( string mess, real timeOut = 0 ); не передбачає блокування транспорту поза викликом цієї функції, а відтак, для складних протоколів із посилками відповіді більш ніж у одному пакеті, що передбачає процес "доочікування", не можна використовувати спільний транспорт, за яким можливе надсилання пакетів різних протоколів або навіть один, але з різних завдань (об'єктів контролерів). Відтак, якщо є потреба використання спільного транспорту, то розташовуйте параметри опитування за протоколом у одному об'єкті контролеру (завдані) або використовуйте модуль користувацького протоколу, до якого це зауваження не має стосунку, оскільки він здійснює таке блокування на час виклику процедури обробки, як і решта модульних протоколів OpenSCADA.
Для розташування реалізації протоколу тут ви маєте виконати та дотримуватися наведених вимог:
- бути власником прав або автором коду та розповсюджувати його під будь-якою вільною ліцензією, перевага надається GPL;
- приготувати та зберегти у окремому файлі БД SQLite, або як текстовий файл, щодо: опису параметрів (ВВ), коду процедури написаному та відформатованому за якоюсь системою;
- написати короткий опис та інструкцію підключення пристрою за протоколом у спосіб схожий на інші тут;
- написати прямий запит до теми форуму "Розробка OpenSCADA" щодо розташування протоколу тут, включити докази його працездатності від будь-якого розробника OpenSCADA або коротке демонстраційне відео.
1 BT: RDTech UM24C, UM25C та UM34C (RDTech) |
1.1 | GPLv2 | * | en,uk | Роман Савоченко |
Шаблон BlueTooth інтерфейсу до RDTech UM24C/UM25C/UM34C. ![]() Наразі перевірено лише на UM24C.
Наразі перевірено лише на UM24C.
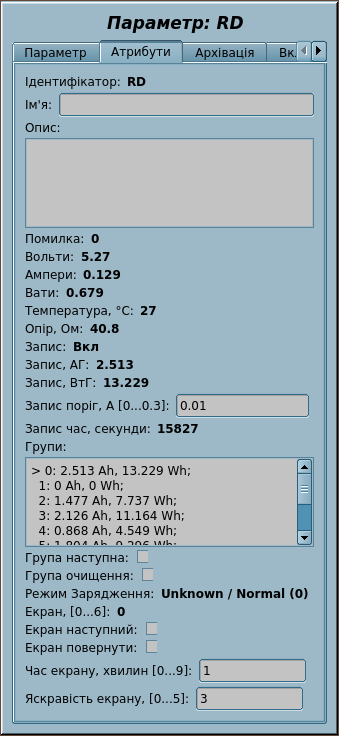
UM24C, UM25C та UM34C від RDTech (RuiDeng) є недорогими пристроями вимірювання прохідної потужності на USB, та вони підтримують достатню колекцію властивостей так само як і забезпечують повний контроль через Bluetooth. Цей шаблон реалізує найбільш явні команди та збір даних, які доступні через Bluetooth інтерфейс пристрою.
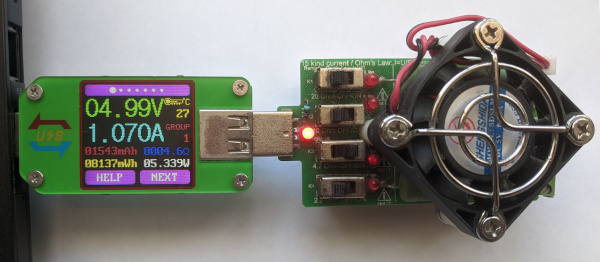
Цей шаблон вперше використовує нову функцію підключення вихідних транспортів SYS.Transport.outAt() та Bluetooth інтерфейс для збору даних.
- Загальна працемісткість: 0.3 ЛД[!]
- Подяки: Райан Фінніє за початкове опрацювання протоколу у RDUMTOOL
ВВ шаблону
| Ідентифікатор | Параметр | Тип | Режим | Атрибут | Конфігурація | Значення |
|---|---|---|---|---|---|---|
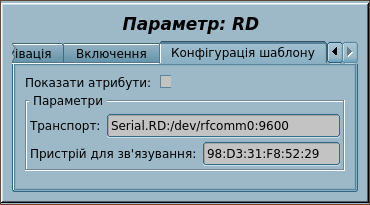
| transport | Транспорт | Рядок | Вхід | Не атрибут | Константа | Serial.RD:/dev/rfcomm0:9600||1000:40-20 |
| dev | Пристрій для зв'язування
На кшталт "98:D3:31:F8:52:29" для зв'язування за допомогою "rfcomm bind {N} 98:D3:31:F8:52:29". |
Рядок | Вхід | Не атрибут | Константа | |
| V | Вольти | Реальний | Вхід | Тільки читання | Змінна | |
| A | Ампери | Реальний | Вхід | Тільки читання | Змінна | |
| W | Вати | Реальний | Вхід | Тільки читання | Змінна | |
| T | Температура, °С | Цілий | Вхід | Тільки читання | Змінна | |
| R | Опір, Ом | Реальний | Вхід | Тільки читання | Змінна | |
| rec | Запис | Логічний | Вхід | Тільки читання | Змінна | |
| recAh | Запис, АГ | Реальний | Вхід | Тільки читання | Змінна | |
| recWh | Запис, ВтГ | Реальний | Вхід | Тільки читання | Змінна | |
| recThr | Запис поріг, А [0...0.3] | Реальний | Вхід | Повний доступ | Змінна | |
| recTm | Запис час, секунди | Реальний | Вхід | Тільки читання | Змінна | |
| grps | Групи | Текст | Вхід | Тільки читання | Змінна | |
| grpNext | Група наступна | Логічний | Вхід | Повний доступ | Змінна | |
| grpClear | Група очищення | Логічний | Вхід | Повний доступ | Змінна | |
| chMode | Режим Зарядження | Рядок | Вхід | Тільки читання | Змінна | |
| scr | Екран, [0...6] | Цілий | Вхід | Тільки читання | Змінна | |
| scrNext | Екран наступний | Логічний | Вхід | Повний доступ | Змінна | |
| scrRot | Екран повернути | Логічний | Вхід | Повний доступ | Змінна | |
| scrTm | Час екрану, хвилин [0...9] | Цілий | Вхід | Повний доступ | Змінна | |
| scrBright | Яскравість екрану, [0...5] | Цілий | Вхід | Повний доступ | Змінна | |
| this | Об'єкт | Об'єкт | Вхід | Не атрибут | Змінна | |
| f_stop | Прапорець зупинки функції | Логічний | Вхід | Не атрибут | Змінна | 0 |
| f_start | Прапорець запуску функції | Логічний | Вхід | Не атрибут | Змінна | 0 |
| f_err | Помилка функції | Рядок | Вхід | Не атрибут | Змінна | 0 |
| f_frq | Частота обчислення функції, Гц | Реальний | Вхід | Не атрибут | Змінна | 1000 |
Конфігурація та використання
- 1. Підключення BlueTooth пристрою:
bluetoothctl
#[bluetooth]# scan on
#  Discovery started
#  [NEW] Device 98:D3:31:F8:52:29 UM24C
#  [CHG] Device 98:D3:31:F8:52:29 RSSI: -60
#[bluetooth]# scan off
#[bluetooth]# pair 98:D3:31:F8:52:29
#  Attempting to pair with 98:D3:31:F8:52:29
#  [CHG] Device 98:D3:31:F8:52:29 Connected: yes
#  Request PIN code
#  [UM241m[agent] Enter PIN code: 1234
#  Pairing successful
#[bluetooth]# trust 98:D3:31:F8:52:29
#  [CHG] Device 98:D3:31:F8:52:29 Trusted: yes
#  Changing 98:D3:31:F8:52:29 trust succeeded
#[bluetooth]# exit

rfcomm bind 0 98:D3:31:F8:52:29   # 0 тут для прив'язування до /dev/rfcomm0
- 2. Створити та запустити об'єкт логічного контролеру або використати будь який наявний із необхідними властивостями планування.
- 3. Створити об'єкт логічного параметру та обрати цей шаблон для нього, один для кожного пристрою. Увімкнути параметр.
- 4. У вкладці "Конфігурація шаблону" об'єкту логічного параметру ви маєте встановити:
- Транспорт — адресу автоматично створюваного транспорту із його параметрами після ":", відповідно до формату адреси функції SYS.Transport.outAt(), де адреса пристрою відповідає команді rfcomm bind 0 у пункті 1.
- Пристрій для зв'язування — тут можна встановити адресу Bluetooth пристрою у вигляді "98:D3:31:F8:52:29" для виклику команди rfcomm bind {N} при запуску шаблону, де N відповідно береться із адреси попереднього пункту.
- 5. РЕЗУЛЬТАТ: Об'єкт логічного параметру здійснюватиме збір даних та відстежуватиме модифікацію записуваних властивостей.
2 BT: ATORCH UC96, UD24 (UC96) |
1.1 | GPLv2 | * | en,uk | Роман Савоченко |
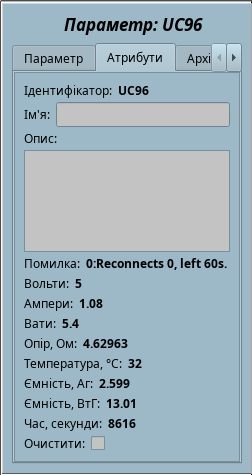
Шаблон BlueTooth інтерфейсу ATORCH UC96, UD24.
The ATORCH UC96, UD24 are low-cost USB pass-through power measurement device with many interfaces and supporting a decent number of collection features, as well as control via Bluetooth. This template implements only the clearing data command and data collection by the device's Bluetooth interface.
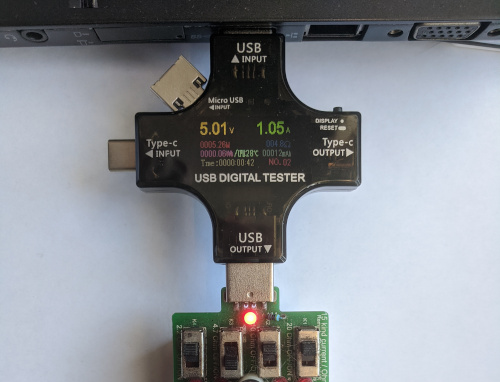
Пристрій надсилає пакети даних не за запитом, тобто розсилає із періодом у одну секунду. ![]() Пристрій може не надсилати пакети даних при увімкнені не на першому екрані, тож вам необхідно перемкнутися на перший екран для появи даних. Дані також можуть бути відсутні після присипляння ПК, тож цей шаблон першим реалізує виявлення відсутності даних і перепідключення.
Пристрій може не надсилати пакети даних при увімкнені не на першому екрані, тож вам необхідно перемкнутися на перший екран для появи даних. Дані також можуть бути відсутні після присипляння ПК, тож цей шаблон першим реалізує виявлення відсутності даних і перепідключення.
- Загальна працемісткість: 0.3 ЛД[!]
ВВ шаблону
| Ідентифікатор | Параметр | Тип | Режим | Атрибут | Конфігурація | Значення |
|---|---|---|---|---|---|---|
| transport | Транспорт | Рядок | Вхід | Не атрибут | Константа | Serial.UC96:/dev/rfcomm0:9600||1000:40-20 |
| dev | Пристрій для зв'язування
На кшталт "58:F4:04:33:D5:FD" для зв'язування за допомогою "rfcomm bind {N} 58:F4:04:33:D5:FD". |
Рядок | Вхід | Не атрибут | Константа | |
| noDataTm | Час виявлення відсутності даних, секунд | Цілий | Вхід | Не атрибут | Константа | 60 |
| V | Вольти | Реальний | Вхід | Тільки читання | Змінна | |
| A | Ампери | Реальний | Вхід | Тільки читання | Змінна | |
| W | Вати | Реальний | Вхід | Тільки читання | Змінна | |
| R | Опір, Ом | Реальний | Вхід | Тільки читання | Змінна | |
| T | Температура, °С | Цілий | Вхід | Тільки читання | Змінна | |
| Ah | Ємність, Аг | Реальний | Вхід | Тільки читання | Змінна | |
| Wh | Ємність, ВтГ | Реальний | Вхід | Тільки читання | Змінна | |
| Tm | Час, секунди | Цілий | Вхід | Тільки читання | Змінна | |
| clear | Очистити | Логічний | Вхід | Повний доступ | Змінна | |
| this | Об'єкт | Об'єкт | Вхід | Не атрибут | Змінна | |
| f_start | Прапорець запуску функції | Логічний | Вхід | Не атрибут | Змінна | 0 |
| f_err | Помилка функції | Рядок | Вхід | Не атрибут | Змінна | 0 |
| f_frq | Частота обчислення функції, Гц | Реальний | Вхід | Не атрибут | Змінна | 1000 |
| f_stop | Прапорець зупинки функції | Логічний | Вхід | Не атрибут | Змінна | 0 |
Конфігурація та використання
- 1. Підключення BlueTooth пристрою: здійснюється стандартним чином через парування і довіри без PIN та до UC96_SPP
- 2. Створити та запустити об'єкт логічного контролеру або використати будь який наявний із необхідними властивостями планування.
- 3. Створити об'єкт логічного параметру та обрати цей шаблон для нього, один для кожного пристрою. Увімкнути параметр.
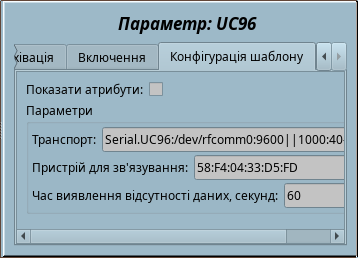
- 4. У вкладці "Конфігурація шаблону" об'єкту логічного параметру ви маєте встановити:
- Транспорт — адресу автоматично створюваного транспорту із його параметрами після ":", відповідно до формату адреси функції SYS.Transport.outAt(), де адреса пристрою відповідає команді rfcomm bind 0.
- Пристрій для зв'язування — тут можна встановити адресу Bluetooth пристрою у вигляді "58:F4:04:33:D5:FD" для виклику команди rfcomm bind {N} при запуску шаблону, де N відповідно береться із адреси попереднього пункту.
-
 Команда rfcomm зазвичай недоступна для виклику непривілейованим користувачем та якщо ви все-ж бажаєте викликати її таким користувачем, то маєте встановити їй ознаку chmod u+s /usr/bin/rfcomm від привілейованого користувача.
- Час виявлення відсутності даних — тут ви можете встановити час виявлення відсутності даних.
- 5. РЕЗУЛЬТАТ: Об'єкт логічного параметру здійснюватиме збір даних та відстежуватиме модифікацію записуваних властивостей.
3 One Wire by DS9097 (1W_DS9097) |
1.2 | GPLv2 | * | en | |
4 One Wire by DS9097U (1W_DS9097U) |
1.2 | GPLv2 | * | en | Roman Savochenko |
One Wire sensors bus implementing by 1Wire-adapter {DS9097,DS9097U}. Supported direct and parasite powering for the temperature sensors.
Supported 1Wire-devices: DS1820, DS1820/DS18S20/DS1920 (not tested), DS1822 (not tested), DS2413, DS2408, DS2450, DS2438.

Template IOs
| Identifier | Parameter | Type | Mode | Attribute | Configuration | Value |
|---|---|---|---|---|---|---|
| transport | Transport of the One Wire bus, Serial | String | Input | Not attribute | Constant | oneWire |
| tmResc | Rescan period, s | Real | Input | Not attribute | Constant | 60 |
| power | Power, for temperature | Boolean | Input | Read only | Variable | |
| this | Object | Object | Input | Not attribute | Variable | |
| f_frq | Function calculate frequency (Hz) | Real | Input | Not attribute | Variable | 1000 |
| f_start | Function start flag | Boolean | Input | Not attribute | Variable | 0 |
| f_stop | Function stop flag | Boolean | Input | Not attribute | Variable | 0 |
| f_err | Function error | String | Input | Not attribute | Variable | 0 |
Configuring and using
- 1. Create an output transport of the type "Serial" and set its Identifier like to "oneWire", one for each the One Wire bus.
- 2. Set proper address of the Serial device, only for the adapter's serial device like "/dev/ttyS{N}". The serial port speed, asynchronous data format and timeouts will adjust by the template.
- 3. Create and start a logical controller object or use any presented one with the needed scheduling properties.
- 4. Create a logical parameter object and select the template for that, one for each the devices. Enable the parameter.
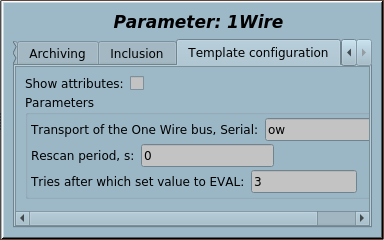
- 5. Into the tab "Template configuration" of the logical parameter object you need to set:
- Transport of the One Wire bus, Serial — to the address of the transport into step 1. Tracing for the address changing is supported.
- Rescan period, s — periodicity of rescaning for new and removed devices search.
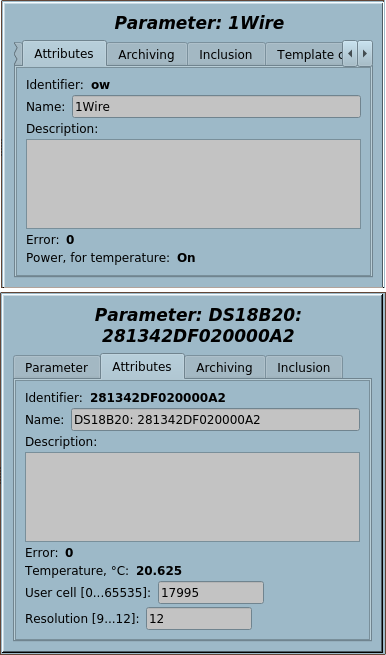
- 6. RESULT: The logical parameter object will perform at first searching to 1Wire devices on the bus and create included parameters to the each found one. Next the logical parameter object will perform gather data of the found devices and trace to modify of the writable device's properties.
5 I2C: PCF8591 (PCF8591) |
1.0 | GPLv2 | * | en | Roman Savochenko |
I2C 8-bit 4xA/D and D/A converter. Connects through a Serial output transport into the I2C mode.
Template IOs
| Identifier | Parameter | Type | Mode | Attribute | Configuration | Value |
|---|---|---|---|---|---|---|
| transport | Transport of the I2C, Serial | String | Input | Not attribute | Constant | i2c |
| addr | Device address [0...119] | Integer | Input | Not attribute | Constant | 72 |
| vRef | Reference voltage, V | Real | Input | Not attribute | Constant | 3.2 |
| ai0 | AI0 | Real | Input | Read only | Variable | |
| ai1 | AI1 | Real | Input | Read only | Variable | |
| ai2 | AI2 | Real | Input | Read only | Variable | |
| ai3 | AI3 | Real | Input | Read only | Variable | |
| ao | AO | Real | Input | Full access | Variable | |
| f_frq | Function calculate frequency (Hz) | Real | Input | Not attribute | Variable | 1000 |
| f_start | Function start flag | Boolean | Input | Not attribute | Variable | 0 |
| f_stop | Function stop flag | Boolean | Input | Not attribute | Variable | 0 |
| f_err | Function error | String | Input | Not attribute | Variable | 0 |
Configuring and using
- 1. Create an output transport of the type "Serial" and set its Identifier like to "i2c", one for each the I2C bus.
- 2. Set proper address of the Serial device, only the I2C bus address like "/dev/i2c-{N}". Set the symbol's time into the timeouts field to the minimum value.
- 3. Create and start a logical controller object or use any presented one with the needed scheduling properties.
- 4. Create a logical parameter object and select the template for that, one for each I2C slave devices. Enable the parameter.
- 5. Into the tab "Template configuration" of the logical parameter object you need to set:
- transport — to the address of the transport into step 1. Tracing for the address changing is supported.
- addr — the I2C slave device's address [0...119].
- vRef — reference voltage of the AIs and AO.
- 6. RESULT: The logical parameter object will perform interaction and placing of gathered data to the AI attributes and also will take the AO and write to the chip.
6 I2C: PCF8574 (PCF8574) |
1.0 | GPLv2 | * | en | Roman Savochenko |
I2C 8-bit 8DIO. Connects through a Serial output transport into the I2C mode.
Template IOs
| Identifier | Parameter | Type | Mode | Attribute | Configuration | Value |
|---|---|---|---|---|---|---|
| transport | Transport I2C | String | Input | Not attribute | Constant | i2c |
| addr | Device address (0, 119) | Integer | Input | Not attribute | Constant | 39 |
| di0 | DI0 | Boolean | Input | Read only | Variable | |
| di1 | DI1 | Boolean | Input | Read only | Variable | |
| di2 | DI2 | Boolean | Input | Read only | Variable | |
| di3 | DI3 | Boolean | Input | Read only | Variable | |
| di4 | DI4 | Boolean | Input | Read only | Variable | |
| di5 | DI5 | Boolean | Input | Read only | Variable | |
| di6 | DI6 | Boolean | Input | Read only | Variable | |
| di7 | DI7 | Boolean | Input | Read only | Variable | |
| do0 | DO0 | Boolean | Output | Full access | Variable | |
| do1 | DO1 | Boolean | Output | Full access | Variable | |
| do2 | DO2 | Boolean | Output | Full access | Variable | |
| do3 | DO3 | Boolean | Output | Full access | Variable | |
| do4 | DO4 | Boolean | Output | Full access | Variable | |
| do5 | DO5 | Boolean | Output | Full access | Variable | |
| do6 | DO6 | Boolean | Output | Full access | Variable | |
| do7 | DO7 | Boolean | Output | Full access | Variable | |
| f_frq | Function calculate frequency (Hz) | Real | Input | Not attribute | Variable | 1000 |
| f_start | Function start flag | Boolean | Input | Not attribute | Variable | 0 |
| f_stop | Function stop flag | Boolean | Input | Not attribute | Variable | 0 |
| f_err | Function error | String | Input | Not attribute | Variable | 0 |
Configuring and using
- 1. Create an output transport of the type "Serial" and set its Identifier like to "i2c", one for each the I2C bus.
- 2. Set proper address of the Serial device, only the I2C bus address like "/dev/i2c-{N}". Set the symbol's time into the timeouts field to the minimum value.
- 3. Create and start a logical controller object or use any presented one with the needed scheduling properties.
- 4. Create a logical parameter object and select the template for that, one for each I2C slave devices. Enable the parameter.
- 5. Into the tab "Template configuration" of the logical parameter object you need to set:
- transport — to the address of the transport into step 1. Tracing for the address changing is supported.
- addr — the I2C slave device's address [0...119].
- 6. RESULT: The logical parameter object will perform interaction and placing of gathered data to the DI attributes and also will take the DO and write to the chip.
7 I2C: ADS101x, ADS111x (ADS111x) |
1.0 | GPLv2 | * | en | Roman Savochenko |
I2C 12/16-bit 4xA/D converter. Connect through a Serial output transport into the I2C mode.
Template IOs
| Identifier | Parameter | Type | Mode | Attribute | Configuration | Value |
|---|---|---|---|---|---|---|
| transport | Transport of the I2C, Serial | String | Input | Not attribute | Constant | i2c |
| addr | Device address [0...119] | Integer | Input | Not attribute | Constant | 72 |
| range | Range, ±V | Integer numbers selection | Input | Full access | Variable | 2 0;1;2;3;4;5 |
| ai0 | AI0 | Real | Input | Read only | Variable | |
| ai1 | AI1 | Real | Input | Read only | Variable | |
| ai2 | AI2 | Real | Input | Read only | Variable | |
| ai3 | AI3 | Real | Input | Read only | Variable | |
| f_frq | Function calculate frequency (Hz) | Real | Input | Not attribute | Variable | 1000 |
| f_start | Function start flag | Boolean | Input | Not attribute | Variable | 0 |
| f_stop | Function stop flag | Boolean | Input | Not attribute | Variable | 0 |
| f_err | Function error | String | Input | Not attribute | Variable | 0 |
Configuring and using
- 1. Create an output transport of the type "Serial" and set its Identifier like to "i2c", one for each the I2C bus.
- 2. Set proper address of the Serial device, only the I2C bus address like "/dev/i2c-{N}". Set the symbol's time into the timeouts field to the minimum value.
- 3. Create and start a logical controller object or use any presented one with the needed scheduling properties.
- 4. Create a logical parameter object and select the template for that, one for each I2C slave devices. Enable the parameter.
- 5. Into the tab "Template configuration" of the logical parameter object you need to set:
- transport — to the address of the transport into step 1. Tracing for the address changing is supported.
- addr — the I2C slave device's address [0...119].
- range — range of voltage of the AIs.
- 6. RESULT: The logical parameter object will perform interaction and placing of gathered data to the AI attributes.
8 I2C: MCP4725 (MCP4725) |
1.0 | GPLv2 | * | en | Roman Savochenko |
I2C 12-bit D/A converter. Connect through a Serial output transport into the I2C mode.
Template IOs
| Identifier | Parameter | Type | Mode | Attribute | Configuration | Value |
|---|---|---|---|---|---|---|
| transport | Transport of the I2C, Serial | String | Input | Not attribute | Constant | i2c |
| addr | Device address [0...119] | Integer | Input | Not attribute | Constant | 96 |
| vRef | Reference voltage, V | Real | Input | Not attribute | Constant | 3.2 |
| ao | AO | Real | Input | Full access | Variable | |
| f_frq | Function calculate frequency (Hz) | Real | Input | Not attribute | Variable | 1000 |
| f_start | Function start flag | Boolean | Input | Not attribute | Variable | 0 |
| f_stop | Function stop flag | Boolean | Input | Not attribute | Variable | 0 |
| f_err | Function error | String | Input | Not attribute | Variable | 0 |
Configuring and using
- 1. Create an output transport of the type "Serial" and set its Identifier like to "i2c", one for each the I2C bus.
- 2. Set proper address of the Serial device, only the I2C bus address like "/dev/i2c-{N}". Set the symbol's time into the timeouts field to the minimum value.
- 3. Create and start a logical controller object or use any presented one with the needed scheduling properties.
- 4. Create a logical parameter object and select the template for that, one for each I2C slave devices. Enable the parameter.
- 5. Into the tab "Template configuration" of the logical parameter object you need to set:
- transport — to the address of the transport into step 1. Tracing for the address changing is supported.
- addr — the I2C slave device's address [0...119].
- vRef — reference voltage of the AO.
- 6. RESULT: The logical parameter object will perform interaction and take the AO and write to the chip.
9 I2C: BMP180 (BMP180) |
1.0 | GPLv2 | * | en | Roman Savochenko |
I2C Pressure and Temperature sensor. Connecting through a Serial output transport into the I2C mode.
Template IOs
| Identifier | Parameter | Type | Mode | Attribute | Configuration | Value |
|---|---|---|---|---|---|---|
| transport | Transport of the I2C, Serial | String | Input | Not attribute | Constant | i2c |
| addr | Device address [0...119] | Integer | Input | Not attribute | Constant | 119 |
| oss | Oversampling setting (0...3) | Integer | Input | Not attribute | Constant | 0 |
| t | T, °С | Real | Input | Read only | Variable | |
| p | P, Pa | Real | Input | Read only | Variable | |
| f_frq | Function calculate frequency (Hz) | Real | Input | Not attribute | Variable | 1000 |
| f_start | Function start flag | Boolean | Input | Not attribute | Variable | 0 |
| f_stop | Function stop flag | Boolean | Input | Not attribute | Variable | 0 |
| f_err | Function error | String | Input | Not attribute | Variable | 0 |
Configuring and using
- 1. Create an output transport of the type "Serial" and set its Identifier like to "i2c", one for each the I2C bus.
- 2. Set proper address of the Serial device, only the I2C bus address like "/dev/i2c-{N}". Set the symbol's time into the timeouts field to the minimum value.
- 3. Create and start a logical controller object or use any presented one with the needed scheduling properties.
- 4. Create a logical parameter object and select the template for that, one for each I2C slave devices. Enable the parameter.
- 5. Into the tab "Template configuration" of the logical parameter object you need to set:
- transport — to the address of the transport into step 1. Tracing for the address changing is supported.
- addr — the I2C slave device's address [0...119].
- oss — oversampling setting of pressure measurement [0...3].
- 6. RESULT: The logical parameter object will perform interaction and placing of gathered data to the Pressure and Temperature attributes.
10 I2C: BME280 (BME280) |
1.0 | GPLv2 | * | en | Arcadiy Kisel, Roman Savochenko |
I2C Barometric Pressure, Temperature and Humidity sensor. Connect through a Serial output transport into the I2C mode.
Template IOs
| Identifier | Parameter | Type | Mode | Attribute | Configuration | Value |
|---|---|---|---|---|---|---|
| transport | Transport of the I2C, Serial | String | Input | Not attribute | Constant | i2c |
| addr | Device address [0...119] | Integer | Input | Not attribute | Constant | 118 |
| oss | Oversampling setting (0...7) | Integer | Input | Not attribute | Constant | 0 |
| t | T, °С | Real | Input | Read only | Variable | |
| p | P, Pa | Real | Input | Read only | Variable | |
| h | H, % | Real | Input | Read only | Variable | |
| f_frq | Function calculate frequency (Hz) | Real | Input | Not attribute | Variable | 1000 |
| f_start | Function start flag | Boolean | Input | Not attribute | Variable | 0 |
| f_stop | Function stop flag | Boolean | Input | Not attribute | Variable | 0 |
| f_err | Function error | String | Input | Not attribute | Variable | 0 |
Configuring and using
- 1. Create an output transport of the type "Serial" and set its Identifier like to "i2c", one for each the I2C bus.
- 2. Set proper address of the Serial device, only the I2C bus address like "/dev/i2c-{N}". Set the symbol's time into the timeouts field to the minimum value.
- 3. Create and start a logical controller object or use any presented one with the needed scheduling properties.
- 4. Create a logical parameter object and select the template for that, one for each I2C slave devices. Enable the parameter.
- 5. Into the tab "Template configuration" of the logical parameter object you need to set:
- transport — to the address of the transport into step 1. Tracing for the address changing is supported.
- addr — the I2C slave device's address [0...119].
- oss — oversampling setting of pressure measurement [0...7].
- 6. RESULT: The logical parameter object will perform interaction and placing of gathered data to the Pressure, Temperature and Humidity attributes.
11 I2C: SHT3x (SHT3x) |
1.0 | GPLv2 | * | en | Roman Savochenko |
Digital Temperature and Humidity Sensor for the models: SHT30
Template IOs
| Identifier | Parameter | Type | Mode | Attribute | Configuration | Value |
|---|---|---|---|---|---|---|
| transport | Transport of the I2C, Serial | String | Input | Not attribute | Constant | i2c |
| addr | Device address [0...119] | Integer | Input | Not attribute | Constant | 68 |
| H | Humidity | Real | Input | Read only | Variable | |
| T | Temperature | Real | Input | Read only | Variable | |
| f_frq | Function calculate frequency (Hz) | Real | Input | Not attribute | Variable | 1000 |
| f_start | Function start flag | Boolean | Input | Not attribute | Variable | 0 |
| f_stop | Function stop flag | Boolean | Input | Not attribute | Variable | 0 |
| f_err | Function error | String | Input | Not attribute | Variable | 0 |
Configuring and using
- 1. Create an output transport of the type "Serial" and set its Identifier like to "i2c", one for each the I2C bus.
- 2. Set proper address of the Serial device, only the I2C bus address like "/dev/i2c-{N}". Set the symbol's time into the timeouts field to the minimum value.
- 3. Create and start a logical controller object or use any presented one with the needed scheduling properties.
- 4. Create a logical parameter object and select the template for that, one for each I2C slave devices. Enable the parameter.
- 5. Into the tab "Template configuration" of the logical parameter object you need to set:
- transport — to the address of the transport into step 1. Tracing for the address changing is supported;
- addr — the I2C slave device's address [0...119].
- 6. RESULT: The logical parameter object will perform interaction and placing of gathered data to the Temperature and Humidity attributes.
12 I2C: DS1307,DS3231 (DS3231) |
1.1 | GPLv2 | * | en | Roman Savochenko |
I2C RTC chips DS1307,DS3231 with Temperature sensor and calibration for DS3231. Connects through a Serial output transport into the I2C mode.
Template IOs
| Identifier | Parameter | Type | Mode | Attribute | Configuration | Value |
|---|---|---|---|---|---|---|
| transport | Transport of the I2C, Serial | String | Input | Not attribute | Constant | i2c |
| addr | Device address [0...119] | Integer | Input | Not attribute | Constant | 119 |
| mode | Mode | Integer numbers selection | Input | Full access | Variable | 0
0;1 |
| tm | Date and time, YYYY-MM-DDTHH:mm:SS | String | Input | Full access | Variable | |
| pSQW | Enable SQUARE-WAVE OUTPUT | Boolean | Input | Full access | Variable | |
| pSQWf (dynamically updated) |
SQUARE-WAVE OUTPUT frequency | Integer | Input | Full access | Variable | |
| agOff (dynamically created for DS3231) |
Aging offset, [-128...127] | Integer | Input | Full access | Variable | |
| t (dynamically created for DS3231) |
T, °С | Real | Input | Read only | Variable | |
| p32k (dynamically created for DS3231) |
Enable 32768Hz | Boolean | Input | Full access | Variable | |
| f_frq | Function calculate frequency (Hz) | Real | Input | Not attribute | Variable | 1000 |
| f_start | Function start flag | Boolean | Input | Not attribute | Variable | 0 |
| f_stop | Function stop flag | Boolean | Input | Not attribute | Variable | 0 |
| f_err | Function error | String | Input | Not attribute | Variable | 0 |
Configuring and using
- 1. Create an output transport of the type "Serial" and set its Identifier like to "i2c", one for each the I2C bus.
- 2. Set proper address of the Serial device, only the I2C bus address like "/dev/i2c-{N}". Set the symbol's time into the timeouts field to the minimum value.
- 3. Create and start a logical controller object or use any presented one with the needed scheduling properties.
- 4. Create a logical parameter object and select the template for that, one for each I2C slave devices. Enable the parameter.
- 5. Into the tab "Template configuration" of the logical parameter object you need to set:
- transport — to the address of the transport into step 1. Tracing for the address changing is supported.
- addr — the I2C slave device's address [0...119].
- 6. RESULT: The logical parameter object will perform interaction and placing of gathered data to the DateTime, Temperature and some one state attributes and also will take the DateTime, some one state attributes and write it to the chip.
13 I2C: AT24C{32|64} (AT24CXX) |
1.0 | GPLv2 | * | en | Roman Savochenko |
Provides operations with EEPROM memory based on I2C chips AT24C32 (4KB) and AT24C64 (8KB). Supported random reading and writing.
Output user protocol's XML request structure
<{cmd} addr="{ChipAddr}" off="{MemOffset}" size="{ReadSize}" err="1:Error">{ReadWriteSeq}</{cmd}>
- cmd — command, for now there allowed: "read", "write";
- addr — I2C device address [0...119];
- off — memory part offset;
- size — read memory block size.
- ReadWriteSeq — Read/Write bytes sequence.
- err — sets to result of the request.
Configuring and using
- 1. Create an output transport of the type "Serial" and set its Identifier like to "i2c", one for each the I2C bus.
- 2. Set proper address of the Serial device, only the I2C bus address like "/dev/i2c-{N}". Set the symbol's time into the timeouts field to the minimum value.
- 3. Place some requesting commands directly into presented or a new internal OpenSCADA procedure like to:
req = SYS.XMLNode("read"); req.setAttr("ProtIt","AT24CXX").setAttr("addr",87).setAttr("off",1000).setAttr("size",20).setText("My message");
req = SYS.XMLNode("write"); req.setAttr("ProtIt","AT24CXX").setAttr("addr",87).setAttr("off",1000).setText("Stored data");
- 4. RESULT: Into text() for "read" you will get the read data if no errors occur.
14 GPIO: DHT11,22 (DHT) |
1.0 | GPLv2 | * | en | Roman Savochenko |
Digital Temperature and Humidity Sensor for models: DHT11, DHT12, AM2302, AM2320, ... . The module designed for the sensors connect through GPIO, mostly it's Raspberry PI BCM2835 GPIO.
Conditions: Exclusively realtime planing in the priority 199 (FIFO-99).
Template IOs
| Identifier | Parameter | Type | Mode | Attribute | Configuration | Value |
|---|---|---|---|---|---|---|
| addr | GPIO address with functions mode(), get() and put(), mostly it's BCM2835 | String | Input | Not attribute | Constant | DAQ.GPIO.io.pi |
| pin | IO pin number of the GPIO | Integer | Input | Not attribute | Constant | 17 |
| tries | Tries [1...5] | Integer | Input | Not attribute | Constant | 2 |
| dev | Device (0-DHT11, 1-DHT22) | Integer | Input | Not attribute | Constant | 1 |
| t | T, °С | Real | Input | Read only | Variable | |
| h | H, % | Real | Input | Read only | Variable | |
| f_frq | Function calculate frequency (Hz) | Real | Input | Not attribute | Variable | 1000 |
| f_start | Function start flag | Boolean | Input | Not attribute | Variable | 0 |
| f_stop | Function stop flag | Boolean | Input | Not attribute | Variable | 0 |
| f_err | Function error | String | Input | Not attribute | Variable | 0 |
Configuring and using
- 1. Create an output controller object and a parameter into the DAQ module "BCM 2835", by default it's "pi.pi".
- 2. Create and start a logical controller object or use any presented one with the needed scheduling properties (FIFO-199).
- 3. Create a logical parameter and select the template for that, one for each sensor. Enable the parameter.
- 4. Into the tab "Template configuration" of the logical parameter object you need to set:
- addr — to the address of the "BCM 2835" parameter like "DAQ.GPIO.io.pi"; tracing for the address changing is supported;
- pin — GPIO pin number where connected the data pin of the sensor;
- tries — tries of the sensor reading;
- dev — generic device specific selection.
- 5. RESULT: The logical parameter will perform interaction and placing of the gathered data to the Temperature and Humidity attributes.
15 GPIO: MAX6675 (MAX6675) |
0.1 | GPLv2 | * | en | Arcadiy Kisel |
Cold-Junction-Compensated K-Thermocouple-to-Digital Converter (0°C to +1024°C). The module designed for the sensors connect through softSPI by GPIO, mostly it's Raspberry PI BCM2835 GPIO.
Conditions: Exclusively realtime planing in the priority 199 (FIFO-99).
Template IOs
| Identifier | Parameter | Type | Mode | Attribute | Configuration | Value |
|---|---|---|---|---|---|---|
| addr | GPIO address with functions mode(), get() and put(), mostly it's BCM2835 | String | Input | Not attribute | Constant | DAQ.GPIO.io.pi |
| pin_cs | CS pin number of the GPIO | Integer | Input | Not attribute | Constant | 8 |
| pin_sclk | SCLK pin number of the GPIO | Integer | Input | Not attribute | Constant | 11 |
| pin_miso | MISO pin number of the GPIO | Integer | Input | Not attribute | Constant | 9 |
| t | T, °С | Real | Output | Read only | Variable | |
| f_frq | Function calculate frequency (Hz) | Real | Input | Not attribute | Variable | 1000 |
| f_start | Function start flag | Boolean | Input | Not attribute | Variable | 0 |
| f_stop | Function stop flag | Boolean | Input | Not attribute | Variable | 0 |
| f_err | Function error | String | Input | Not attribute | Variable | 0 |
Configuring and using
- 1. Create an output controller object and a parameter into the DAQ module "BCM 2835", by default it's "pi.pi".
- 2. Create and start a logical controller object or use any presented one with the needed scheduling properties (FIFO-199).
- 3. Create a logical parameter and select the template for that, one for each sensor. Enable the parameter.
- 4. Into the tab "Template configuration" of the logical parameter object you need to set:
- addr — to the address of the "BCM 2835" parameter like "DAQ.GPIO.io.pi"; tracing for the address changing is supported;
- pin_cs — CS pin number where connected the chip selection pin of the sensor;
- pin_sclk — SCLK pin number where connected the serial clock pin of the sensor;
- pin_miso — MISO pin number where connected the master in slave out (data) pin of the sensor.
- 5. RESULT: The logical parameter will perform interaction and placing of the gathered data to the Temperature attributes.
16 GPIO|I2C: 1602A(HD44780) (1602A) |
1.0 | GPLv2 | * | en | Roman Savochenko |
LCD Module 1602A, STN, BLUB, 16 Character x 2 Line, 5 x 8 Dots, by the direct (Raspberry PI BCM2835 GPIO) or I2C (PCF8574) wiring.
Conditions: Default planing policy but realtime one preferred.
Template IOs
| Identifier | Parameter | Type | Mode | Attribute | Configuration | Value |
|---|---|---|---|---|---|---|
| transport | Transport of the I2C, Serial (i2c) or GPIO address with function put(), mostly it's BCM2835 (DAQ.GPIO.io.pi) |
String | Input | Not attribute | Constant | i2c |
| addr | I2C device address [0...119] | Integer | Input | Not attribute | Constant | 39 |
| RS | GPIO Pin: Reset | Integer | Input | Not attribute | Constant | 7 |
| E | GPIO Pin: Enable | Integer | Input | Not attribute | Constant | 8 |
| D4 | GPIO Pin: Data4 | Integer | Input | Not attribute | Constant | 25 |
| D5 | GPIO Pin: Data5 | Integer | Input | Not attribute | Constant | 24 |
| D6 | GPIO Pin: Data6 | Integer | Input | Not attribute | Constant | 23 |
| D7 | GPIO Pin: Data7 | Integer | Input | Not attribute | Constant | 18 |
| ln1 | Line 1 | String | Input | Full access | Variable | |
| ln2 | Line 2 | String | Input | Full access | Variable | |
| f_frq | Function calculate frequency (Hz) | Real | Input | Not attribute | Variable | 1000 |
| f_start | Function start flag | Boolean | Input | Not attribute | Variable | 0 |
| f_stop | Function stop flag | Boolean | Input | Not attribute | Variable | 0 |
| f_err | Function error | String | Input | Not attribute | Variable | 0 |
Configuring and using
- 1. Create an output controller and an object of parameter in DAQ module "BCM 2835", by default it's "pi.pi" or create an output transport of the type "Serial", set address like to "i2c", one for each the I2C bus.
- 2. Create and start a logical controller object or use any presented one with the needed scheduling properties.
- 3. Create a logical parameter object and select the template for that, one for each sensor. Enable the parameter.
- 4. Into the tab "Template configuration" of the logical parameter object you need to set:
- transport — to address of the "BCM 2835" parameter like to "DAQ.GPIO.io.pi" or to address of the transport into step 1; tracing for the address changing is supported;
- addr — the I2C slave device's address [0...119];
- RS, E, D4, D5, D6, D7 — numbers of the GPIO pins where connected the proper data ones of the sensor.
- 5. RESULT: The logical parameter object will perform interaction and setting lines' values to the display.
